This blog will provide an overview of the physical layer of IoT devices and how microcontrollers interact with hardware components via GPIO.
Note
📌 IoT Series (Part 5 of 6): This is the fifth article in our 6-part IoT series.
- 👈 Previous: Part 4: Connect your device to the Internet
- 👉 Next: Part 6: Getting Started with PlatformIO

Table of contents
Open Table of contents
What is GPIO?
- GPIO stands for General Purpose Input/Output.
- Standard hardware pins on microcontrollers used to interface with external hardware or communication protocols.
- Provides connections for Power (3.3V / 5V), Ground (0V), and Programmable Pins (Analog / Digital).
- Typically dedicated to one device per set of pins unless using a shared bus protocol (e.g., I2C, SPI).
GPIO Digital Pins
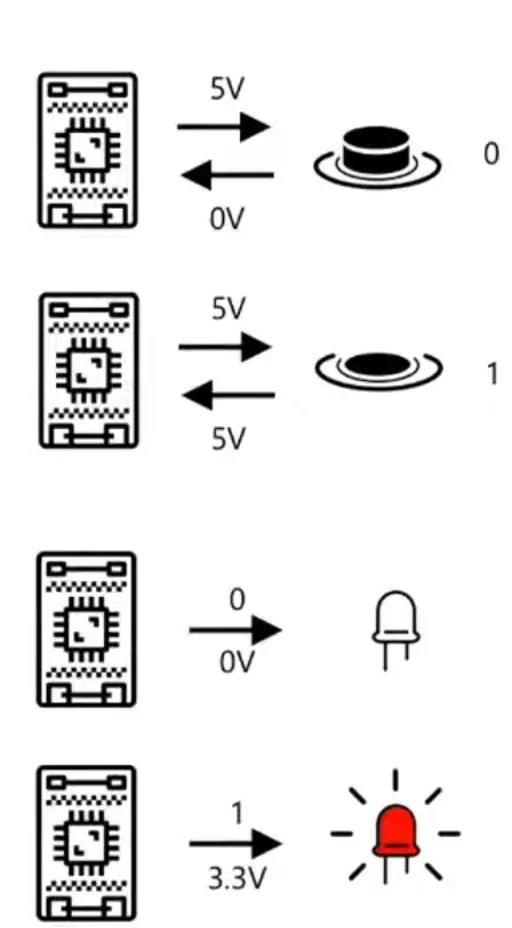
Digital Input (Reading Signals)
Microcontrollers read external voltages relative to Ground to determine binary states:
- HIGH (Bit 1): External voltage is ~3.3V (or 5V, above Ground) → Microcontroller interprets as 1 (HIGH).
- LOW (Bit 0): External voltage is ~0V (equal to Ground) → Microcontroller interprets as 0 (LOW).
Digital Output (Controlling Components)
The microcontroller actively drives voltage at the pin based on your code to control connected components (e.g., turning on an LED, triggering a relay, or sounding a buzzer):
- HIGH (Bit 1): Connects the pin to the internal power rail → Outputs 3.3V (or 5V).
- LOW (Bit 0): Connects the pin directly to Ground → Returns to 0V.
GPIO Analog Pins
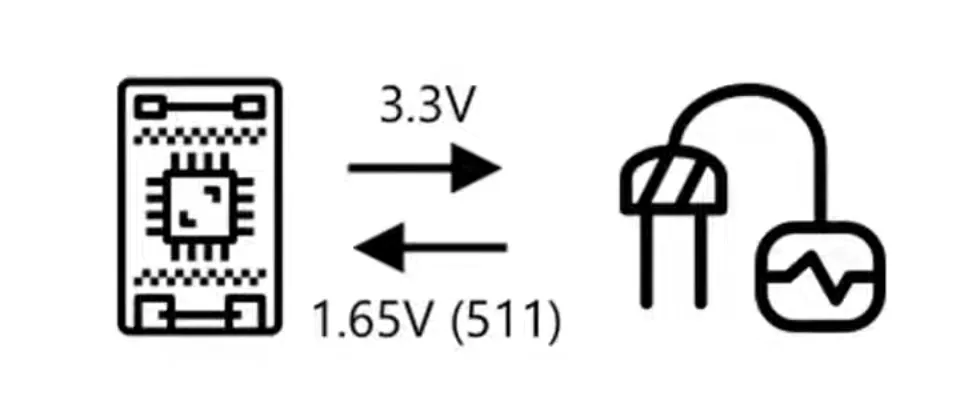
- Analog pins can send or receive a range of voltages from 0 to 3.3/5V.
- Input pins use an ADC to convert to a 10-bit number.
- Output pins use an DAC to convert from a 10-bit number.
Hardware Communication Protocols
Microcontrollers use serial protocols to communicate with sensors, displays, and peripheral chips. Here are the 3 main protocols in IoT:
1. I²C (Inter-Integrated Circuit)
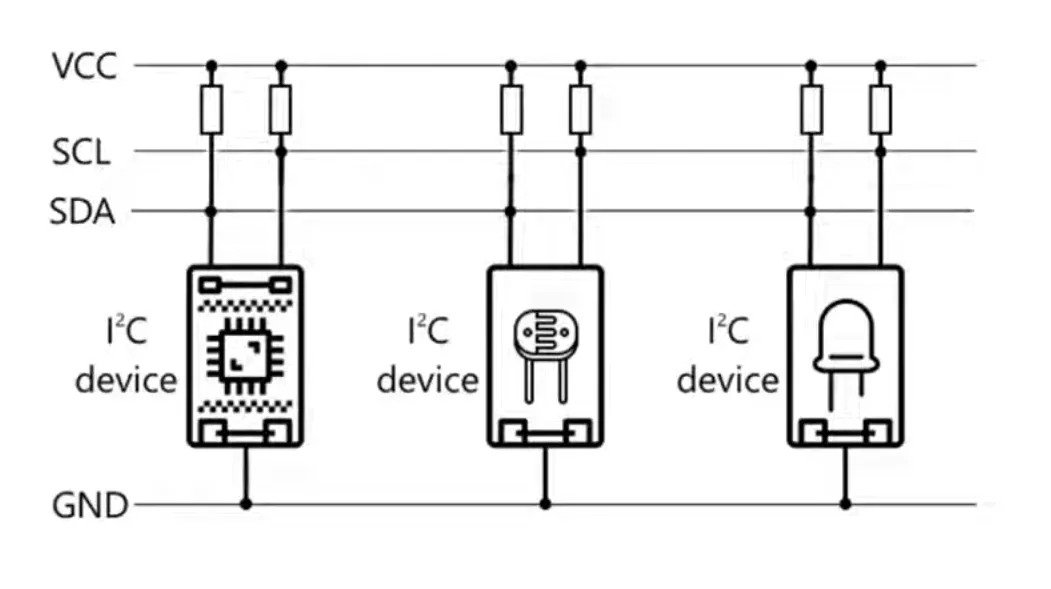
- What it is: A 2-wire synchronous bus protocol for connecting multiple low-speed sensors over shared lines.
- Signal Wires (2):
- SDA (Serial Data): Carries bidirectional data packets.
- SCL (Serial Clock): Clock signal driven by the controller.
- Key Advantage: Uses unique 7-bit addresses so up to 127 devices can share just 2 signal pins.
2. UART (Universal Asynchronous Receiver-Transmitter)
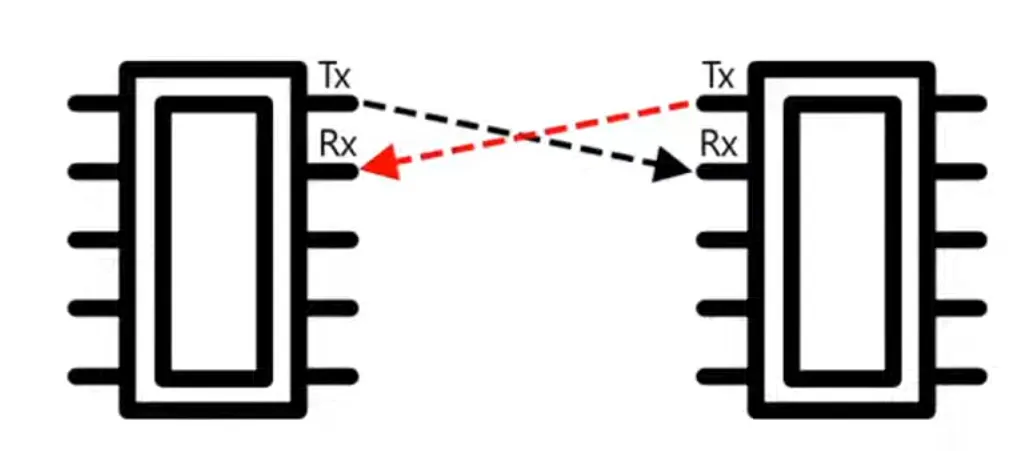
- What it is: A 2-wire asynchronous protocol used for direct 1-to-1 communication between two devices.
- Signal Wires (2):
- TX (Transmit): Sends data → connects to RX on the receiving device.
- RX (Receive): Receives data → connects to TX on the transmitting device.
- Key Advantage: No clock line required; both devices simply agree on a fixed baud rate (speed).
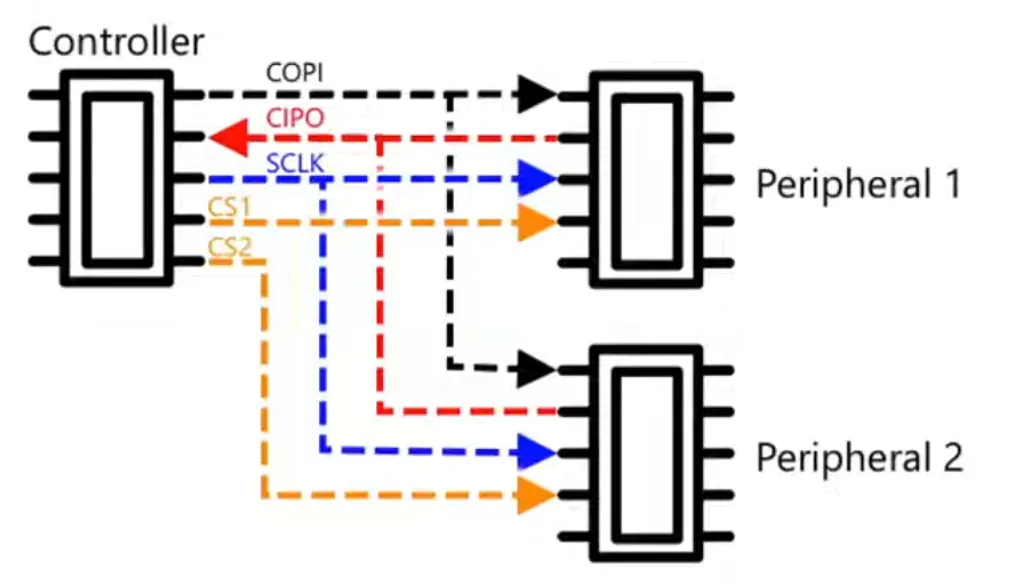
3. SPI (Serial Peripheral Interface)
- What it is: A synchronous protocol designed for ultra-high-speed data transfers across multiple peripherals using dedicated Chip Select lines.
- Signal Wires (4+):
- COPI (Controller Out Peripheral In): Controller sends data to peripheral (formerly MOSI).
- CIPO (Controller In Peripheral Out): Peripheral sends data to controller (formerly MISO).
- SCLK (Serial Clock): Clock signal driven by the controller to synchronize data transfer.
- CS / CS1, CS2… (Chip Select): Dedicated enable lines used by the controller to select and talk to specific target peripherals on the bus.
- Key Advantage: Extremely fast full-duplex communication (ideal for LCD screens, SD cards, and high-speed flash memory).
4. Wireless Protocols
- IoT devices can also communicate over wireless.
- BLE, WiFi, LoRa, Zigbee and 5G are common wireless protocols used in IoT.
⚡ Quick Protocol Comparison
| Feature | UART | I²C | SPI |
|---|---|---|---|
| Topology | Point-to-Point (1 to 1) | Multi-Device Bus (1 to Many) | Multi-Device Bus (1 to Many) |
| Signal Wires | 2 (TX, RX) | 2 (SDA, SCL) | 4+ (COPI, CIPO, SCLK, CS) |
| Clock Line | None (Asynchronous) | SCL (Synchronous) | SCLK (Synchronous) |
| Data Flow | Full-Duplex | Half-Duplex | Full-Duplex |
| Speed | Slow (~115.2 kbps) | Moderate (Up to 3.4 Mbps) | Very Fast (10 – 100+ Mbps) |
| Best For | GPS modules, PC serial, Bluetooth | Temp/Light sensors, OLEDs | SD Cards, Color Displays, Flash |
📖 Series Navigation
👈 Back to Part 4: Connect your device to the Internet
👉 Continue to Part 6: Getting Started with PlatformIO