This blog will introduce some of the communication protocols that IoT devices can use to connect to the cloud, and types of data they might send or receive.
📌 IoT Series (Part 4 of 5): This is the fourth article in our 5-part IoT series.

Table of contents
Open Table of contents
Introduction
The I in IoT stands for Internet - the cloud connectivity can enable a lot of features for your IoT devices from gathering measure data from sensors, to sending messages to control the actuators.
- Data gathered from sensors and sent to the cloud is called telemetry.
- Message received from cloud often contains commands to control actuators to perform an action.
Communication Protocols
- One of the most popular protocols are based around publish/subscribe messaging via some kind of broker.
- The IoT devices connect to the broker, publish telemetry messages and subscribe to commands.
- The cloud services also connect to broker, subscribe to telemetry messages and publish commands to specific devices or to group of devices.
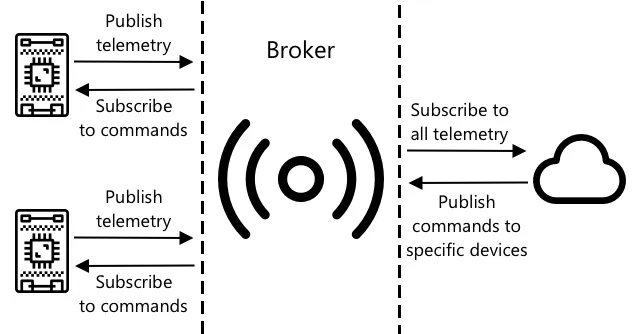
MQTT is the most popular communication protocol in IoT.
Messaging Queueing Telemetry Transport (MQTT)
MQTT has a single broker and multiple clients. All clients connect to the broker and broker routes messages to the relevant clients. Messages are routed based on the topics*. A client can publish to a topic and any clients that subscribe to that topic can receive the message.
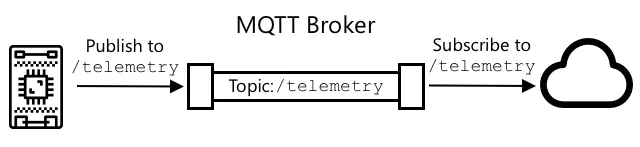
Connect IoT device into MQTT
We will look how to connect IoT nightlight to the internet and allow it to be remotely controlled.
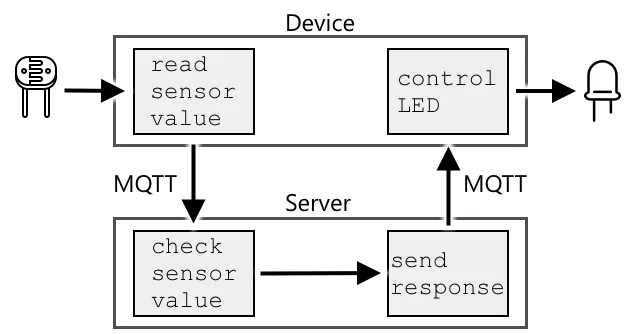
- Add library to communicate over MQTT
import paho.mqtt.client as mqtt- Add client_name unique (user older version of MQTT)
id = '680a5957-ed79-4b84-be34-6c3910a8237c'
client_name = id + 'nightlight_client'

mqtt_client = mqtt.Client(callback_api_version=mqtt.CallbackAPIVersion.VERSION1, client_id=client_name)- Connect to MQTT broker and starts loop that runs in a background thread listening for messages on any subscribed topics
mqtt_client.connect('test.mosquitto.org')
mqtt_client.loop_start()
Deeper dive into MQTT
Hierarchy of MQTT topics
- You can send temperature messages to the topic /telemetry/temperature and humidity messages to the /telemetry/humidity.
- Then in your cloud app subscribe to the */telemetry/ ** topic to receive both temperature and humidity messages.
Quality of Service (QoS)
This determines the guarantee of messages being received.
- At most once - the message is sent only once and the client take no additional steps to acknowledge the message.
- At least once - the message is re-tried by the sender multiple times until acknowledge is received.
- Exactly once - the sender and receiver engage in a two-level handshake to ensure one copy of the message is received.
Send telemetry from your IoT device
In this example, we will send telemetry message from your Raspberry Pi or virtual IoT device to an MQTT broker.
Publish telemetry
- If you are using a virtual IoT device Raspberry Pi, you won’t need to run a virtual environment.
- Import the following:
import json- Add client topic
client_telemetry_topic = id + '/telemetry'- Publish telemetry message to the broker
while True:
    light = light_sensor.light
    telemetry = json.dumps({'light': light})
    print("Sending telemetry ", telemetry)

    mqtt_client.publish(client_telemetry_topic, telemetry)

    time.sleep(5)
Receive telemetry on the server
To receive telemetry data sent from your IoT device, you can set up a server script that subscribes to the telemetry topic on the MQTT broker.
- Create a server script (
server.py) and import the required libraries:
import json
import time
import paho.mqtt.client as mqtt- Set up unique Client ID and Topic (must match the ID used on the device):
id = '680a5957-ed79-4b84-be34-6c3910a8237c'
client_name = id + 'nightlight_server'
client_telemetry_topic = id + '/telemetry'- Connect to the MQTT broker and start the network loop in the background:
mqtt_client = mqtt.Client(callback_api_version=mqtt.CallbackAPIVersion.VERSION2, client_id=client_name)
mqtt_client.connect('test.mosquitto.org')
mqtt_client.loop_start()- Define a callback function
handle_telemetryto handle incoming messages:
def handle_telemetry(client, userdata, message):
    telemetry_message = json.loads(message.payload.decode())
print("Received telemetry message:", telemetry_message)- Subscribe to the telemetry topic and attach the callback:
mqtt_client.subscribe(client_telemetry_topic)
mqtt_client.on_message = handle_telemetry- Keep the server script running:
while True:
    time.sleep(2)
Send commands from the server
Once the server receives telemetry data from the IoT device, it can process the data and send commands back to the device to control actuators (such as turning an LED light on or off).
- Define the command topic in
server.py:
server_command_topic = id + '/command'- Update
handle_telemetryto evaluate the light level and publish a command back to the device:
command = {'led_on': payload['light'] < 300}
print("Sending command message:", command)
mqtt_client.publish(server_command_topic, json.dumps(command))
Here is the complete server.py script:
import json
import time
import paho.mqtt.client as mqtt

id = '680a5957-ed79-4b84-be34-6c3910a8237c'
client_name = id + 'nightlight_server'
client_telemetry_topic = id + '/telemetry'
server_command_topic = id + '/command'

mqtt_client = mqtt.Client(callback_api_version=mqtt.CallbackAPIVersion.VERSION2, client_id=client_name)
mqtt_client.connect('test.mosquitto.org')
mqtt_client.loop_start()

def handle_telemetry(client, userdata, message):
    payload = json.loads(message.payload.decode())
    print("Received telemetry message:", payload)
    command = {'led_on': payload['light'] < 300}
    print("Sending command message:", command)
    mqtt_client.publish(server_command_topic, json.dumps(command))

mqtt_client.subscribe(client_telemetry_topic)
mqtt_client.on_message = handle_telemetry

while True:
    time.sleep(2)
Receive and process commands on the device
To allow the IoT device to respond to commands sent from the server, update app.py to subscribe to the command topic and register a callback handler.
- Define
handle_commandinapp.pyto control the LED actuator based on the received payload:
def handle_command(client, userdata, message):
    payload = json.loads(message.payload.decode())
    print("Received command message:", payload)
    if payload['led_on']:
        led.on()
    else:
led.off()- Subscribe to the command topic and set the
on_messagecallback:
mqtt_client.subscribe(server_command_topic)
mqtt_client.on_message = handle_command
Here is the complete app.py script for the device:
import time
import json
import paho.mqtt.client as mqtt
from counterfit_connection import CounterFitConnection
from counterfit_shims_grove.grove_light_sensor_v1_2 import GroveLightSensor
from counterfit_shims_grove.grove_led import GroveLed

CounterFitConnection.init('127.0.0.1', 5000)
print('Connected to CounterFit server !!!')

led = GroveLed(5)
light_sensor = GroveLightSensor(0)

id = '680a5957-ed79-4b84-be34-6c3910a8237c'
client_name = id + 'nightlight_client'
client_telemetry_topic = id + '/telemetry'
server_command_topic = id + '/command'

mqtt_client = mqtt.Client(callback_api_version=mqtt.CallbackAPIVersion.VERSION2, client_id=client_name)
mqtt_client.connect('test.mosquitto.org')

def handle_command(client, userdata, message):
    payload = json.loads(message.payload.decode())
    print("Received command message:", payload)
    if payload['led_on']:
        led.on()
    else:
        led.off()

mqtt_client.subscribe(server_command_topic)
mqtt_client.on_message = handle_command

mqtt_client.loop_start()
print("MQTT connected!")

while True:
    light = light_sensor.light
    telemetry_message = json.dumps({'light': light})
    print("Sending telemetry message:", telemetry_message)
    mqtt_client.publish(client_telemetry_topic, telemetry_message)
    time.sleep(5)
📖 Series Navigation
👈 Back to Part 3: Sensors and Actuators in Internet of Things (IoT)
👉 Continue to Part 5: Overview of Physical Works in IoT